Introduction to the NR 600 Micro Bike Light
The NR 600 Micro Bike Light is a compact yet powerful lighting solution designed for cyclists who demand high visibility and safety. Whether you are commuting through the city or riding on unlit trails, this light provides the perfect balance of brightness and battery life.
In this detailed NR 600 Micro Bike Light Manual, we will cover everything you need to know, from installation and charging to troubleshooting and comparisons. If you want to maximize your bike light’s performance and ensure a safe ride, this guide is for you!
Unboxing & First Impressions
When you first open the package, you will find everything needed to set up and use the NR 600 Micro Bike Light effectively.
What’s in the Box?
| Item | Description |
|---|---|
| NR 600 Micro Light | The main bike light unit |
| Handlebar Mount | Adjustable mount for secure attachment |
| USB Charging Cable | Used for recharging the light |
| User Manual | Basic guide for setup and operation |
The build quality of the NR 600 is impressive, with a durable aluminum casing that ensures longevity and resistance against weather elements. It has a compact, lightweight design, making it easy to carry and mount on different types of bikes.
How to Mount the NR 600 Micro Bike Light Properly
Mounting your bike light correctly is crucial for optimal visibility and safety. A poorly installed light can move around or fall off during rides.
Step-by-Step Installation Guide
- Choose the Right Spot: Position the handlebar mount at the center or slightly to the side, ensuring an unobstructed beam.
- Secure the Mount: Use the adjustable strap to tightly fasten the mount around your bike’s handlebar.
- Attach the Light: Slide the NR 600 onto the mount until it clicks into place securely.
- Adjust the Beam Angle: Tilt the light slightly downward to illuminate the road without blinding oncoming traffic.
For mountain bikes or rough terrain, consider additional securing methods such as rubber padding or alternative mounts for extra stability.
Understanding Light Modes & Brightness Settings
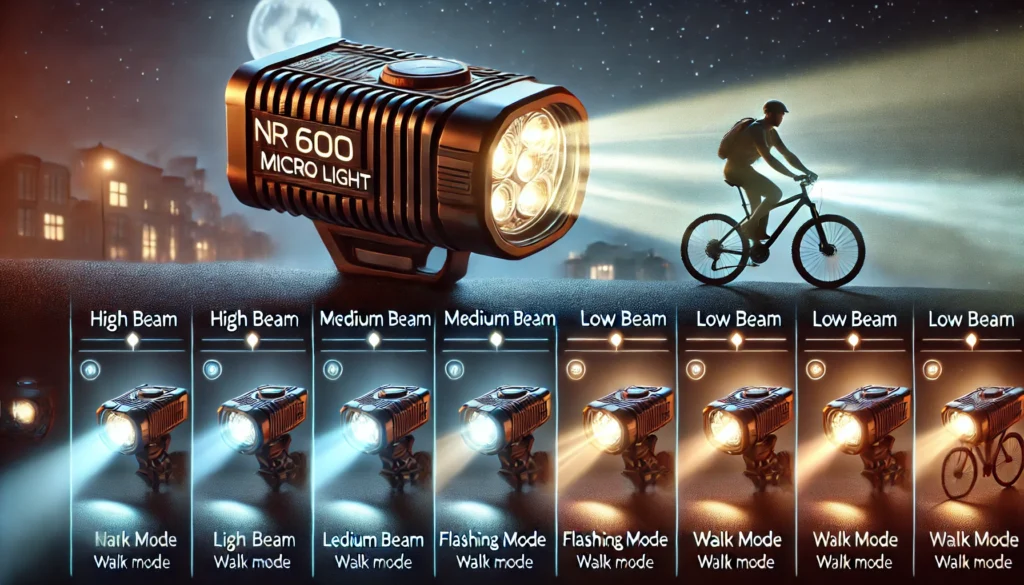
The NR 600 Micro Bike Light offers multiple light modes tailored to different riding conditions.
Available Light Modes
- High Beam: Provides maximum brightness for dark trails and night rides.
- Medium Beam: Suitable for urban commuting with moderate ambient light.
- Low Beam: Helps conserve battery for extended usage.
- Flashing Mode: Improves daytime visibility and attracts attention.
- Walk Mode: A lower brightness option for walking or emergency use.
Switching between these modes is easy, simply press the power button to cycle through options.
Powering & Charging the NR 600 Micro Bike Light
Proper charging habits ensure a long-lasting and efficient battery.
Charging Instructions
- Locate the USB Port: The charging port is covered with a rubber seal to prevent water damage.
- Connect the Cable: Use the provided USB cable and plug it into a power source.
- Monitor the Indicator Light: Red means charging, and green means fully charged.
- Unplug and Seal the Port: Once charged, remove the cable and close the rubber cover securely.
Battery Life Expectations:
| Mode | Estimated Runtime |
|---|---|
| High Beam | 1.5 hours |
| Medium Beam | 3 hours |
| Low Beam | 5 hours |
| Flash Mode | 10 hours |
Troubleshooting & Common Issues
Light Not Turning On?
- Ensure the battery is charged.
- Check for any loose connections.
- Hold the power button for a few seconds to reset.
Flickering or Dimming Light?
- A low battery can cause flickering; recharge the device.
- Inspect for water damage or dirt around the lens.
Charging Problems?
- Try a different USB cable or power adapter.
- Make sure the charging port is dry and clean.
Safety Tips & Best Practices
- Position your light to avoid blinding oncoming traffic.
- Use flashing mode during the day for increased visibility.
- Pair with a rear light for 360° safety.
- Regularly check battery levels before heading out.
Comparison with Other Bike Lights
How does the NR 600 Micro compare to similar models?
| Feature | NR 600 Micro | NR 750 | Competitor X |
|---|---|---|---|
| Brightness | 600 Lumens | 750 Lumens | 500 Lumens |
| Battery Life | Up to 10 hrs | 12 hrs | 8 hrs |
| Weatherproof | Yes | Yes | No |
| Weight | Lightweight | Heavier | Medium |
5 Additional FAQs for Extra Value
- How long does the NR 600 take to charge?
- It takes approximately 2.5 to 3 hours for a full charge.
- Can the NR 600 be used in heavy rain?
- Yes, it is water-resistant, but avoid submerging it in water.
- Is the mount compatible with all bike types?
- Yes, the adjustable mount fits most standard handlebars.
- Does the NR 600 have a strobe mode?
- Yes, the flashing mode acts as a strobe light for visibility.
- Can I replace the battery?
- No, the battery is built-in and not user-replaceable.
Conclusion
The NR 600 Micro Bike Light is an excellent choice for cyclists who need a reliable, bright, and long-lasting bike light. This guide covered everything from installation, charging, troubleshooting, and comparisons to ensure you get the best performance from your light. With proper usage and maintenance, the NR 600 will keep your rides safe and well-lit for years to come!
If you found this NR 600 Micro Bike Light Manual helpful, feel free to share it with fellow cyclists and stay safe on the roads!
RECOMMENDED ARTICLES
Homelite UV80522 Drain Plug Location PDF Free Download – Complete Guide
Authors Storysam Alien Ground Zero: The Ultimate Guide
The Ultimate Guide to P3D Sound Cones Bank
What Is the 300th Digit of 0.0588235294117647? A Comprehensive Guide